DIY Built In Desk
- Libby

- Nov 5, 2019
- 3 min read

If there was a personality test for stubborn people who get a vision in their head and don’t rest until they have it, I’d score 100%.
As soon as we got our floors re-done, I got the itch to start making over my office and craft room. In my initial exploration, I stumbled upon this Ikea Hack and couldn’t get it out of my brain! Here are the steps I took to re-create it in my space.
Materials:
Two dressers (I used these from Target, but the Malm from Ikea was on my list! The original tutorial used the Hemnes but that one is a little pricer and you need to cut off the legs)
Two wood cuts the length and width of your desired desk (mine were 1 1/4 inches thick each and I wanted a thicker look. More on this below!)
Wood stain and polyurethane (I used two coats of Varathane- Espresso and their poly as well)
A thinner piece of wood to cover the seams (I used a piece of lattice that totaled 2.5 inches tall) Wood glue
Drill
Finishing nails and a finishing tool
6 large gold pulls (like these from Amazon)
Steps: 1. The first step is to assemble the two dressers as the instructions read. Be sure to leave off the tops of each dresser and do not install the screws that come with it! The stained wood will become your desktop.
2. Once you have the dressers completed, space them out along the wall as far apart as you want. My entire desk is 96 inches from end to end, which is also the longest they had plywood in stock. It was originally going to be 99 inches but I didn’t want a seam.
3. Next, begin the process of staining the lattice and one of the wood cuts. You don’t need to stain the one that will be on the bottom (or the sides for that matter) because it won’t be seen. Side note, I used these staining pads for the first time on this project and really loved them!

4. While the stain is drying, place the un-stained wood cut on top of your desk. The only downside to this desk is that there will naturally be some space between the dressers (now the back of the desk) and the wall. If it fit perfectly, the desk would be pretty shallow. Anyway! Place it on top and scoot the dressers so that the front of the wood is aligned with the front of the dresser.
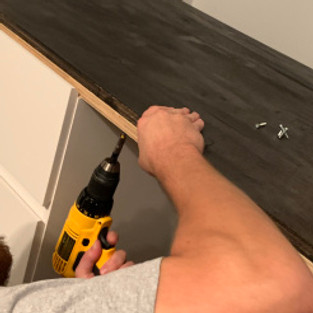
5. Take out your drill and screw directly through the wood cut into the top side of the dresser. I did 6 on each side, three into each side of the dresser and repeated. We used a piece of trim to line up where the dresser ended and figure out where to screw.
6. Once you have stained and sealed the top piece of wood (I did 2 coats of stain and a coat of polyurethane), place the stained piece on top of the other wood you just screwed in, aligning it on the front side. I would recommend putting some wood glue between these two pieces when you sandwich them in! I didn’t but it would be helpful. You can clamp it and let it dry for extra stability.
7. Once that top piece is in place, you’ll need to select screws long enough to go through the bottom piece into the top and join the two, but not long enough to poke through the top. The most technically appropriate thing to do would be to use pocket screws, but I just drilled straight through the bottom into the top piece. To close up the gap even more, we drilled through the side of the top into the bottom piece, because that will get covered up anyway.
8. Now your desk top is essentially fastened to the base, and you can see the lengthy workspace take shape! The rest of the work is cosmetic, so do a little DANCE in this step!
9. The next step is to put wood glue on the back of the lattice and fasten it on to the front of your desk top, hiding the seam where the two wood cuts are sandwiched on top of each other.

10. As that dries, place finishing nails strategically throughout the front where needed to give the front panel a tighter seam. A nail set tool is crucial here (video)! You’ll want to sink the nails below the wood surface so you can fill in the holes with wood filler and disguise the holes.
11. Once the structure is complete, you can drill holes and install your sassy gold pulls. I got 12″ pulls with 10″ space between each hole. Be sure to measure both the hole spacing and the length you want and search that way! We drilled the holes first, and then placed the screws through the back into the holes.


Comments